This article contains affiliate links, and we may earn a commission at no cost to you if you choose to purchase through these links. I never recommend products that I do not trust or will not advise my veterinary clients and patients to use.
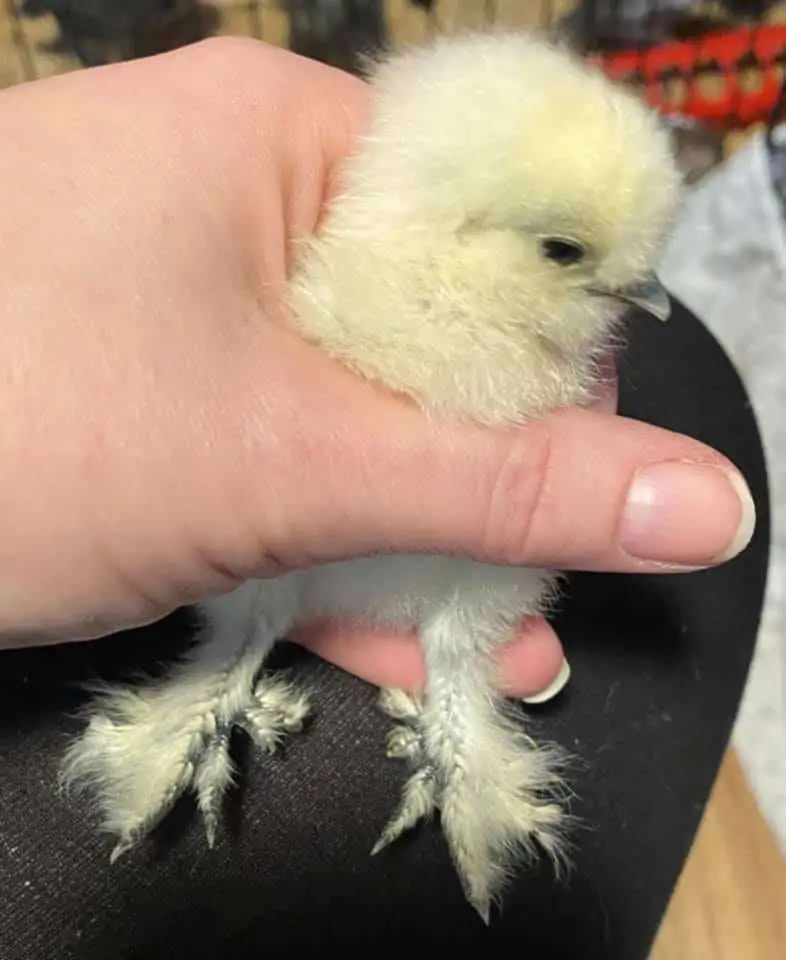
So, we know that silkies are fluffy all over (even on their feet) and you might even know that silkies have more toes than the average feathered friend, but do you know that these traits can make them more susceptible to certain conditions? Special-looking chicken feet need extra special TLC!
Silkies have feathered feet with five toes on each foot rather than four as in other bird species. Foot diseases are among the most common problems encountered by silkies of which scaly leg mite, bumblefoot, and overgrown toenails are among the most common.
In this article, we have a look at normal silkie feet conformation as well as the most common foot diseases silkies suffer from plus we share 8 tips on how to keep your silkies’ feet happy and healthy.
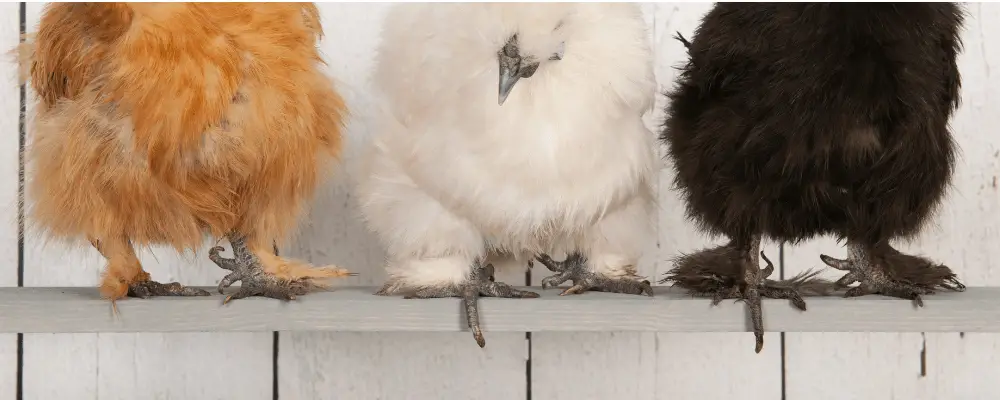
Normal Silkie Chicken Feet
If we look at the breed standards for show silkies, they need to have 5 toes on each foot and feathers preferably on all 5 toes but at least up to the third toe (starting from lateral toe). The toes should be straight and the nails short.
Silkies with 4 or 6 toes or with less than the desired amount of leg feathers are not to be bred with. Now, this is for show silkies so definitely not worth fussing over if you don’t plan on showing your silkies but in the interest of improving the quality of your flock, it is very important to know what problems may be encountered with each of these traits in order to select the best breeding stock and to identify possible problems early on.
The Problem with Extra Toes
Some silkies are born with even 6 toes. Even with the silkie normal of five toes, we can start running into some trouble. The most commonly encountered problem is that some of the toes can grow in odd directions. This often causes the toenail to not be worn down by walking and can lead to overgrown toenails.
The Problem with Feathers on the Feet
Fluffy chicken feet get dirty! And if there is mud around, it can get very bad. Combine this with a small break in the skin of your silkie’s feet and you can end up with some gnarly infections. If dirt and dust cause matting of the feathers it can end up causing the bird a large amount of discomfort.
Dirt clumps on silkie feet should be removed on a regular in order to prevent problems from occurring. The best course of action will be to soak the feet in some lukewarm water (you can add some Epsom salts) and try to remove as much of the dirt. Wear gloves for this expedition as the dirt on the feet is most likely poop. If the clumps can not be softened with lukewarm water, it is best to clip the dirty feathers near the base of the shaft using a manicure scissor.
Common Foot Conditions
Overgrown toenails
Most chickens wear down their toenails scratching in the dirt but occasionally they may need some help. What we commonly see in silkies is that some of the toes do not lie flat and may point in abnormal directions causing the nails to grow in strange directions. These nails should be trimmed regularly to avoid running into problems.
How to Trim a silkie’s toenails
Like dog and cat toenails, silkie chicken toenails have a quick that contains the blood supply to provide the nail with the nutrients to grow. Silkies have black toenails, which means that you won’t be able to see the quick of their nails. This makes trimming silkie toenails a bit more challenging. Bleeding toenails are likely to be encountered but do not fear – below we have easy steps to clip the nails and to get a bleeding nail to stop.
What you’ll need:
- A wet cloth to wipe down dirty feet
- Small guillotine style pet nail clippers like this one or, if you cant get hold of pet nail clippers, a small, sharp side cutter will also work
- Paper towel
- Styptic powder
- Nail file
- Wound spray or antiseptic spray such as Vetericyn Poultry spray and a small container such as a bottle cap to decant a small amount of stypric powder into for direct application to bleeding nails
- A friend to help you hold the chickens
It will be best if you plan to check the feet and clip the nails of your entire flock in one sitting so that you don’t miss any chickens. This is also a great opportunity to check for signs of any of the diseases mentioned below.
- Ask your friend to hold the chicken with it’s back resting in his/her non dominant arm and them holding both feet with their dominant hand so that the chicken is lying on it’s back and both feet is securely held in the other hand.
- Use the damp cloth to wipe down dirt if the feet are very dirty.
- Grab one toe between your thumb and forefinger. They will try to pull away but just hold firmly. Chickens usually don’t like their feet being touched so don’t worry that you are hurting them.
- Start by clipping a small portion off the tip of the nail. Rather start with small bites and clip off small bits at a time to avoid a bleeding nail. Do not remove more than 25% of the nail in one sitting. If the nails are very long, rather leave it for a 5-7 days and then come back to remove some more. If the nail starts bleeding, it means that you have cut the nail slightly too short. Dab the blood using the paper towel and hold pressure to help stop the bleeding for a few seconds. Have the styptic powder handy for these situations. Quickly remove the paper towel and dip the nail in a small amount of decanted styptic powder to help stop the bleeding. Do not panic if the bleeding does not seem to stop immediately. Just keep holding pressure. It will stop eventually.
- If the nail started bleeding and you have the bleeding under control, spray with the Veterycin spray to avoid infection.
- If you see any sharp spurrs after the nail has been clipped, you can file it down with the nail file to create mooth edges and avooid is snagging on anything.
- Place the chicken in a seperate pen/area to mark that it has been done.
Silkie’s feet should be checked for long nails every 2- 3 weeks. You will get to know each of your flock members’ foot quirks after doing this a few times and know to watch out for that one (or probably more than one) silkie whose fifth toe points in a funky direction with a subsequent overgrown toenail.
Scaly Leg Mite
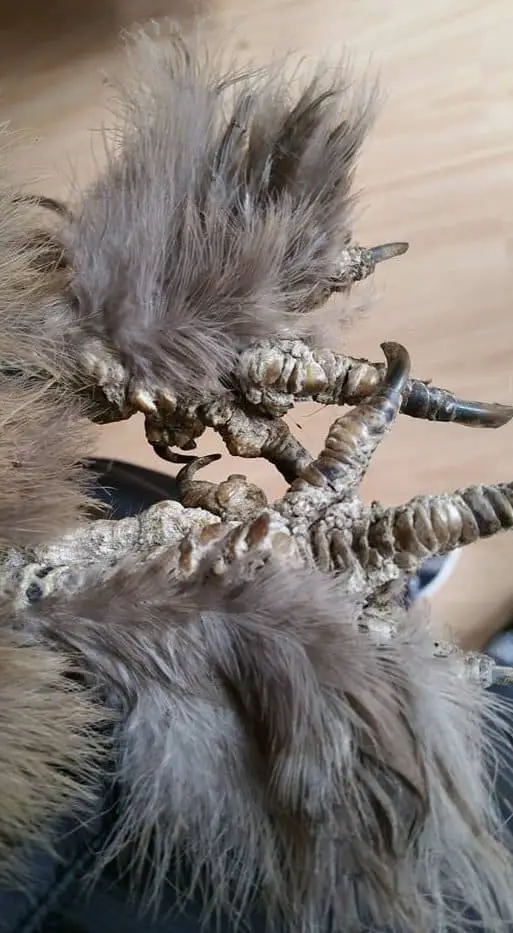
Scaly leg mites (Knemodocoptes Mutans) are probably the most common external parasite of poultry. The mites burrow into the skin of the chicken’s legs and the top of their feet causing scaling and crusting and eventually flaking of the skin. The compromised skin makes them susceptible to secondary bacterial infections and if left untreated, it can lead to permanent deformities crippling the bird.
Normal silkie feet scales are smooth and the scales lie flat. When the birds have scaly leg mite infestation, the scales are uneven, crusty, and even raised and the skin will be thickened. If this becomes severe, the heavy crusting can start interfering with normal flexion of the joints resulting in lameness and deformity.
K. mutans is spread by direct contact between infected birds. The infection is usually introduced when new birds are added to the flock or by exposure to wild birds or rodents. If your flock ends up getting scaly leg mites, affected birds must be isolated as soon as possible and the entire coop cleaned. Toss all bedding and dust the entire area with poultry permethrin dust.
The treatment of choice for scaly leg mites is firstly to suffocate the mites and to help promote the growth of new scales by applying paraffin oil or petroleum jelly to the legs and feet of all the infected birds. This should ideally be done twice daily until the old, damaged scales fall off and new healthy scales grow in. Ivermectin can also be used as a topical solution or orally at a specific dose, two weeks apart, as prescribed by your vet. Don’t use the eggs while they are being treated with ivermectin up to 10 days after the second treatment.
If there is severe crusting or open sores, I strongly advise getting a vet’s help to save the bird’s feet. They will be able to help you address secondary infection and pain with the correct medication.
Take heart and hang in there because scaly leg mites may take several months to resolve.
To prevent the massive headache that is scaly leg mite, isolate new chickens bought in for at least a week to monitor for any symptoms before introducing them to your flock. Minimizing contact with wild birds and rodents will also help reduce the risk of introducing scaly leg mites but is rather difficult to attain in a backyard flock. A dust bath can also be beneficial to reduce external parasites.
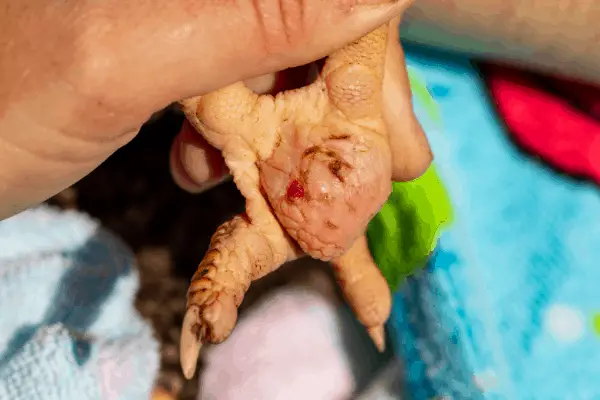
Bumblefoot
Bumblefoot can go by many names: Pododermatitis, foot Pad dermatitis, Paw Burns, or Footpad ulcers. It is a condition affecting the bottom of a chicken’s foot and is often first noted as hard, sometimes pus-filled pockets on the bottom of a chicken’s foot covered by a brown or black cloured scab. This can be an extremely painful condition and the birds will often be very reluctant to walk.
There are a few things that can cause silkies to be susceptible to this disease. Overgrown toenails can prevent them from being able to walk or perch normally.
Silkies with hereditary or acquired foot deformities will also be more susceptible due to uneven pressure being applied to the foot.
A poor diet deficient in biotin and vitamin A will result in poor skin integrity and dry flaky skin that will be more susceptible to the invasion of bacteria due to the compromised skin barrier.
Bumblefoot can be grade ranging from a mild swelling on the bottom of the foot in stage one to severe swelling of the entire foot with a large abscess n the bottom of the foot in grade V.
An important part of treating bumblefoot is firstly addressing the cause, Bumblefoot is primarily a problem of either poor sanitation of the areas where the silkies live or of surfaces too hard or rough for their sensitive feet. A clean coop, enough space to roam with different surface textures, and appropriate perches will help prevent bumblefoot. If surface texture or harness is the main cause, you can consider adding areas with artificial grass (Astroturf) or soft sand.
Depending on the severity of the lesions, treatment can include any of the following:
For mild lesions, soaking the bird’s feet in lukewarm water with Epsom salt or dilute chlorhexidine, will help to soften the hardened and proliferative wound tissue and help treat mild infections.
Bandaging the feet with medical honey or colloidal dressing will help keep the affected area clean and moist to promote healing. There are many types of foot bandages described for chickens but in the end, as long as there is enough padding and the bandage is not too tight as to cause discomfort or obstruct blood flow it should work just fine. Just remember that it is very important that bandages be kept dry as wet bandages constrict witch can end up being detrimental to your silkie’s foot. Change the bandages frequently. If the wound is severe, daily bandage changes will be needed, as the wound starts to heal, you can do bandage changes every second day, but do not leave a bandage on a chicken’s foot for more than 3 days.
Very severe cases of bumblefoot may require surgical debridement. This can only be done by your veterinarian with appropriate pain control and antibiotics.
The earlier bumblefoot is detected, the simpler the treatment is, so make sure to perform regular foot checks on all your silkies in order to pick up problems early.
Frost Bite
Silkies have a slightly better tolerance to cold compared to other chicken breeds but do not cope that well with cold combined with wet conditions. Snow and mud also do not mix well with feathery feet.
Silkies seem to tolerate temperatures of up to -9 F or -22 C, nevertheless, if you live in an area where below-freezing temperatures are experienced on the regular during the winter months, your silkies will be at risk for frostbite. This is not only a condition of the feet and comb can also be affected. Frostbite can be extremely hard to recognize in the early stages in silkies and is often only noticed when the skin starts to harden and shrivel.
Frostbite occurs in several stages of which the first starts of s the surface of the skin on affected areas turns a slightly pale color. In more advanced stages, the skin will turn a dark black color (as a result of dry gangrene) and slowly start to fall away.
If you suspect that your silkies may be suffering from frostbite, get them out of the cold and into a room with a warmer ambient temperature. Wrap the affected areas (not too tightly!) and keep them in the warm room. It is best to get a veterinarian to check on your silkies to assess the severity of the frostbite.
It is important no to do any of the following:
- Do not apply direct heat to the affected areas.
- Do not rub, massage or apply any physical force to the frostbitten areas.
- Do not let them walk around on frostbitten feet as this can cause further damage.
- Do no put them back outside in the cold. The frost bitten areas are very susceptible to even more damage if exposed to cold again.
To prevent frostbite, provide insulation and a heat source such as a heat lamp, heat pad, or coop heater. Make sure that the coop still has appropriate ventilation to prevent moisture build-up. Check your silkies every day during cold spells and if the temperatures are extreme, provide them with a temporary indoor area to protect them against the cold.
8 Tips for Happy (Silkie) Feet
1. Check your flock’s feet at least every 2 weeks.
Silkies can sometimes hide foot conditions under their feathery trousers as not all conditions show up as lameness. Checking their feet at least every two weeks will allow you to pick up any potential problems early and address them. In general, the earlier a foot problem is addressed, the better the prognosis.
2. Make sure the areas where they roam are free of mud (and snow).
A lot of foot problems can be avoided by keeping their feet dry. Their hair-like feathers do not repel water like most other bird species’ feathers and get soaked very easily. The wet feathers love to collect mud, poo, dirt, snow, or pretty much anything they can hang on to. This increases the risk for infections and frostbite.
3. Wash their feet (but not too often).
If the feathers on their feet have collected dirt and mud, it is best to wash your silkie’s legs entirely. Fill a tub with lukewarm soapy water and let your silkie stand in it for a few minutes. Gently massage the feather to loosen any debris and rinse. Softly pat dry with a towel.
Most silkies tolerate a foot spa very well. Just don’t do it too often, as washing their legs too regularly, can lead to the normal skin barrier being compromised, making them more susceptible to infections and injuries.
4. Clip their nails regularly.
Especially keep an eye on those who have toes growing in odd directions. If toenails become overgrown, the quick of the nail also tends to extend further down the nail and this will cause a lot of difficulties correcting an overgrown toenail if it is not addressed promptly.
5. Make sure they have the perect perches.
And with perfect I mean rounded and smooth. Perches of different thicknesses will also be great to make sure that pressure is applied to different areas of the foot depending on which perch they sit on. This will help prevent bumblefoot.
6. Check the surfaces they walk on.
Hard-packed mud, concrete or pavement, wet muddy, and snow-covered surfaces can take their toll on silkie feet. Move them to either dry sandy areas (sand is a good option for coop floor covering) or soft grass if possible. The bottom line is to avoid very hard, very cold, and wet surfaces (I’m sure you will be practically an expert on all the reasons for this by the time you reach this point in the article).
7. Isolate new Silkie’s for 1 week before adding them to your flock.
This is the best way to prevent scaly leg mites from infecting your flock. If the new bird does happen to carry the parasite, signs will be picked up within a week and treatment can be started. It’s much easier to treat one silkie for scaly leg mite than your entire flock!
8. Only select silkies with good feet conformation to breed with.
Foot conformation is a highly heritable trait and therefore avoid choosing birds who have wry toes pointing in weird directions or too many leg feathers constantly collecting mud and dirt. Ideally only breed with silkies who have straight toes and toenails and a modest amount of leg feathering.
The Bottom Line
Silkies have very unique feet and equally unique considerations have to be kept in mind to keep your silkies happily scratching about and running around. Check their feet regularly and don’t hesitate to check with your vet if you are concerned about anything. Universally for all the problems you might face with regards to your silkies’ feet – the earlier you address it, the better the outcome so, keep a close eye on those fluffy tootsies!
References
- Barboza, Trinita, Hugues Beaufrére, and Noel Moens. Effects of Perching Surfaces and Foot Bandaging on Central Metatarsal Foot Pad Weight Loading of the Peregrine Falcon (Falco peregrinus) Journal of Avian Medicine and Surgery 34.1 (2020)
- Schoemaker, N. J., & van Zeeland, Y. R.. Pododermatitis in Birds and Small Animals 8th World Congress of Veterinary Dermatology (2016)
- R Axelson, DVM. Knemidokoptic Mange or Scaly Leg and Face Disease in Birds Niles Animal Hospital and Bird Medical Center (2017)
- Calle PP, Montali RJ, Janssen DL, Stoskopf MK, Strandberg JD.. Distal extremity necrosis in captive birds J Wildl Dis. (1982)
